A Simple Decentralized Image Generator
2022-08-21
Author: Xuan Tang (Carnegie Mellon School of Computer Science, ArcBlock Summer Intern) Mentor: Han Zhang (ArcBlock, Engineer)
This summer I spent a 3-month internship at ArcBlock. During this internship, I learned about web development, including React and Node.js. With this foundation, I read ArcBlock's documentation for developers and gained some understanding of ArcBlock's blocklet platform. After that, I focused on completing a Decentralized App (DApp) that can generate images based on templates. In this blog, I will briefly introduce the project.
Why decentralized image generator matters
In some types of web applications, there is often a need to use a large number of images generated from templates, such as templated product images for e-commerce sites, campaign images for social sharing, Open Graph images for search engine and social link optimization, and so on. It is much more efficient to use a template-based image generator than to let designers design and produce images one by one. In the past, there have been a number of services that help users do this, but the downside is that your site will then be dependent on these third-party services.
A decentralized image generator turns such a template-based image generation service into a composable Blocklet, so that any site that needs to use it can install and combine its own image generator, without any third-party service dependencies.
Design
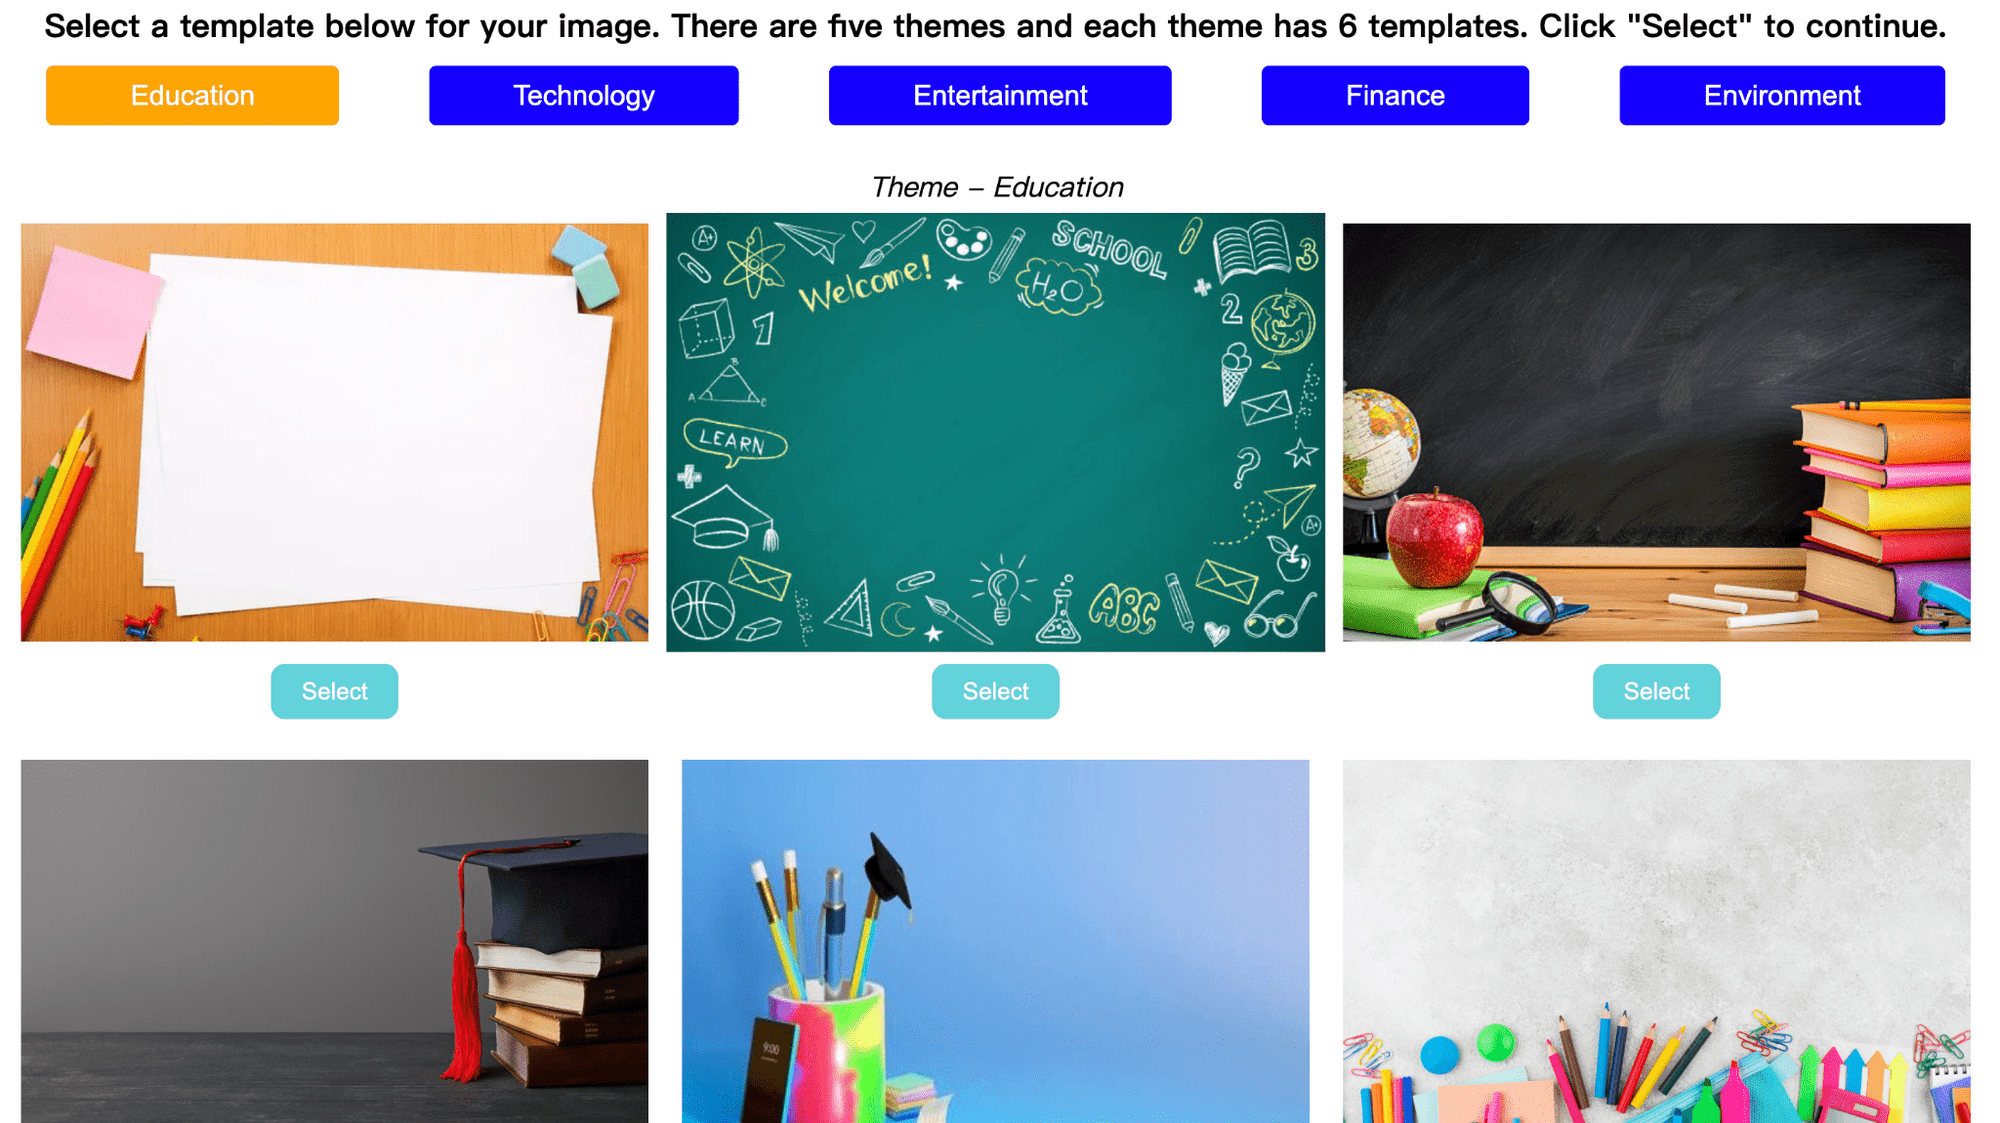
The image generator is divided into two pages: the home page and the edit page. The main page is for users to choose the template they want. As shown in the picture below, there are 5 themes of templates: education, technology, entertainment, finance, and environment. There are 6 templates in each theme to choose from. Once selected, the user will enter the edit page.
The edit page is divided into title section, preview section, parameter editing section, and functional section, and I will introduce these four parts one by one.
Title section and preview section
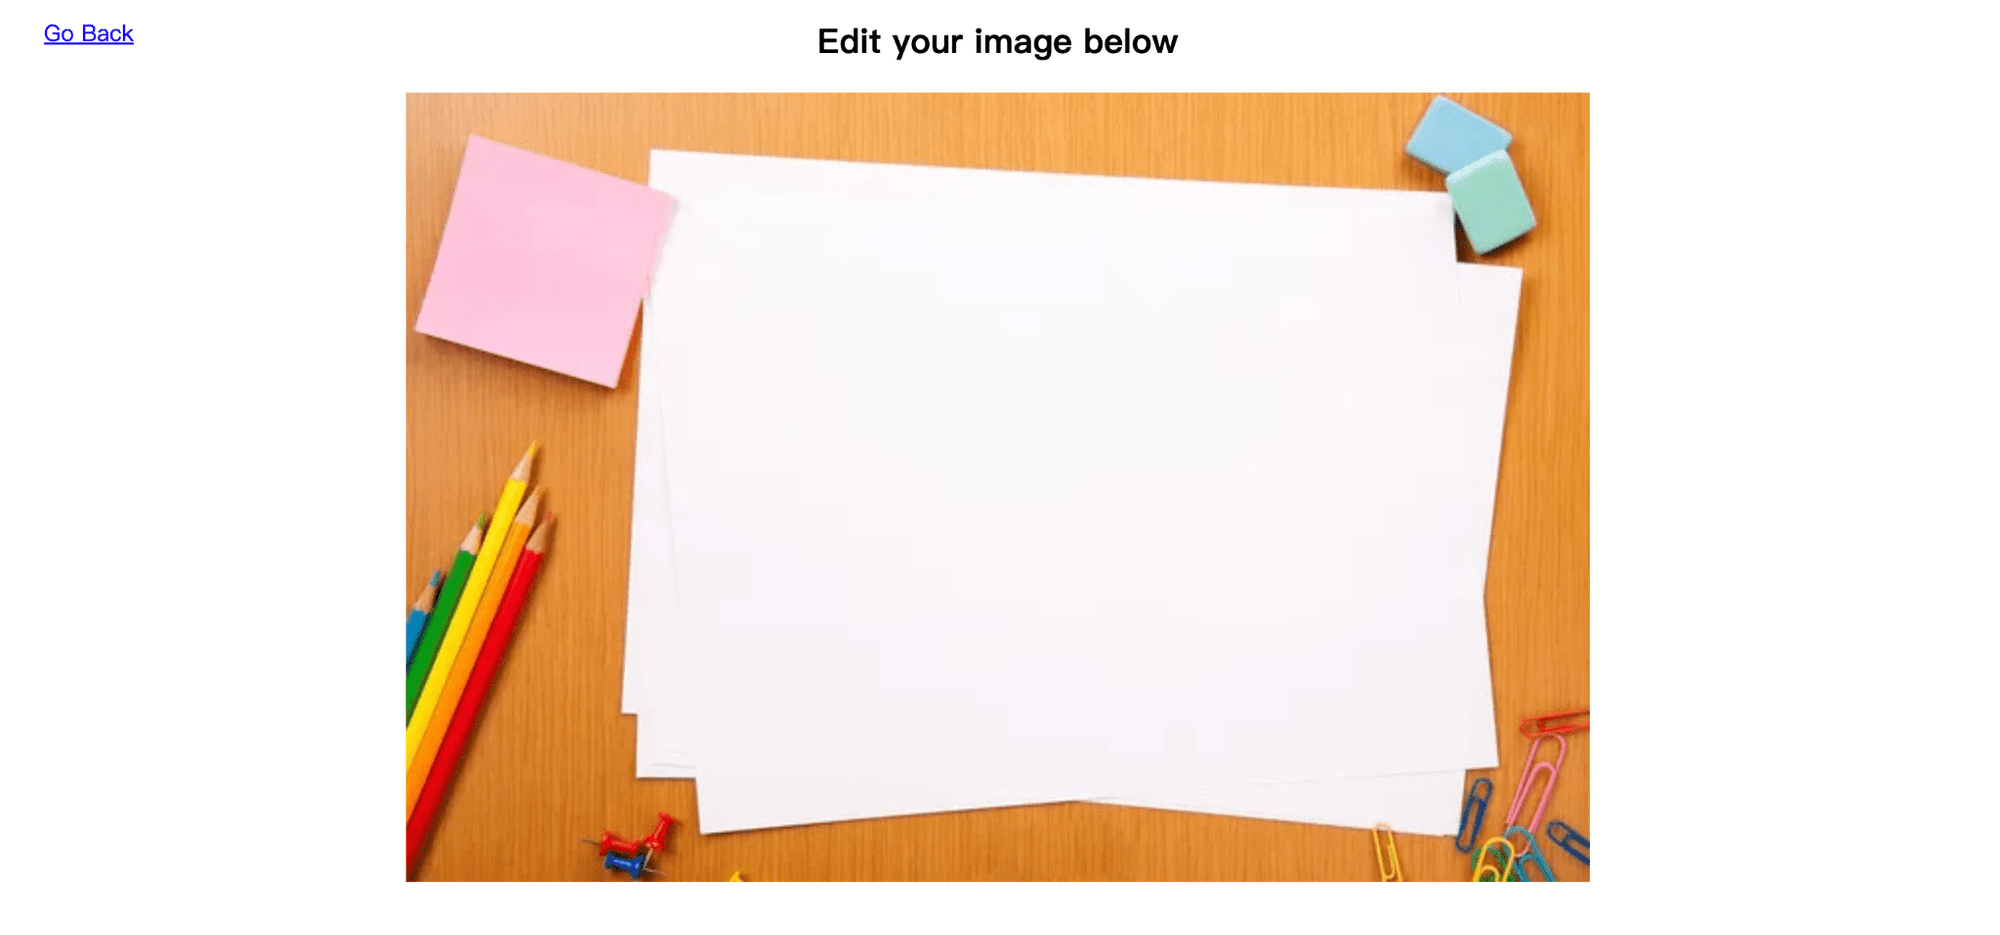
As shown above, the top left corner is a button that returns to the home page. The button and the centered text form the title section. The preview section is displayed below the image, and the initial state shows the template selected by the user. After that, users just need to modify the parameters of the image or add text in the parameter editing section. The changes will be presented to users in the preview section in time.
Parameter editing section
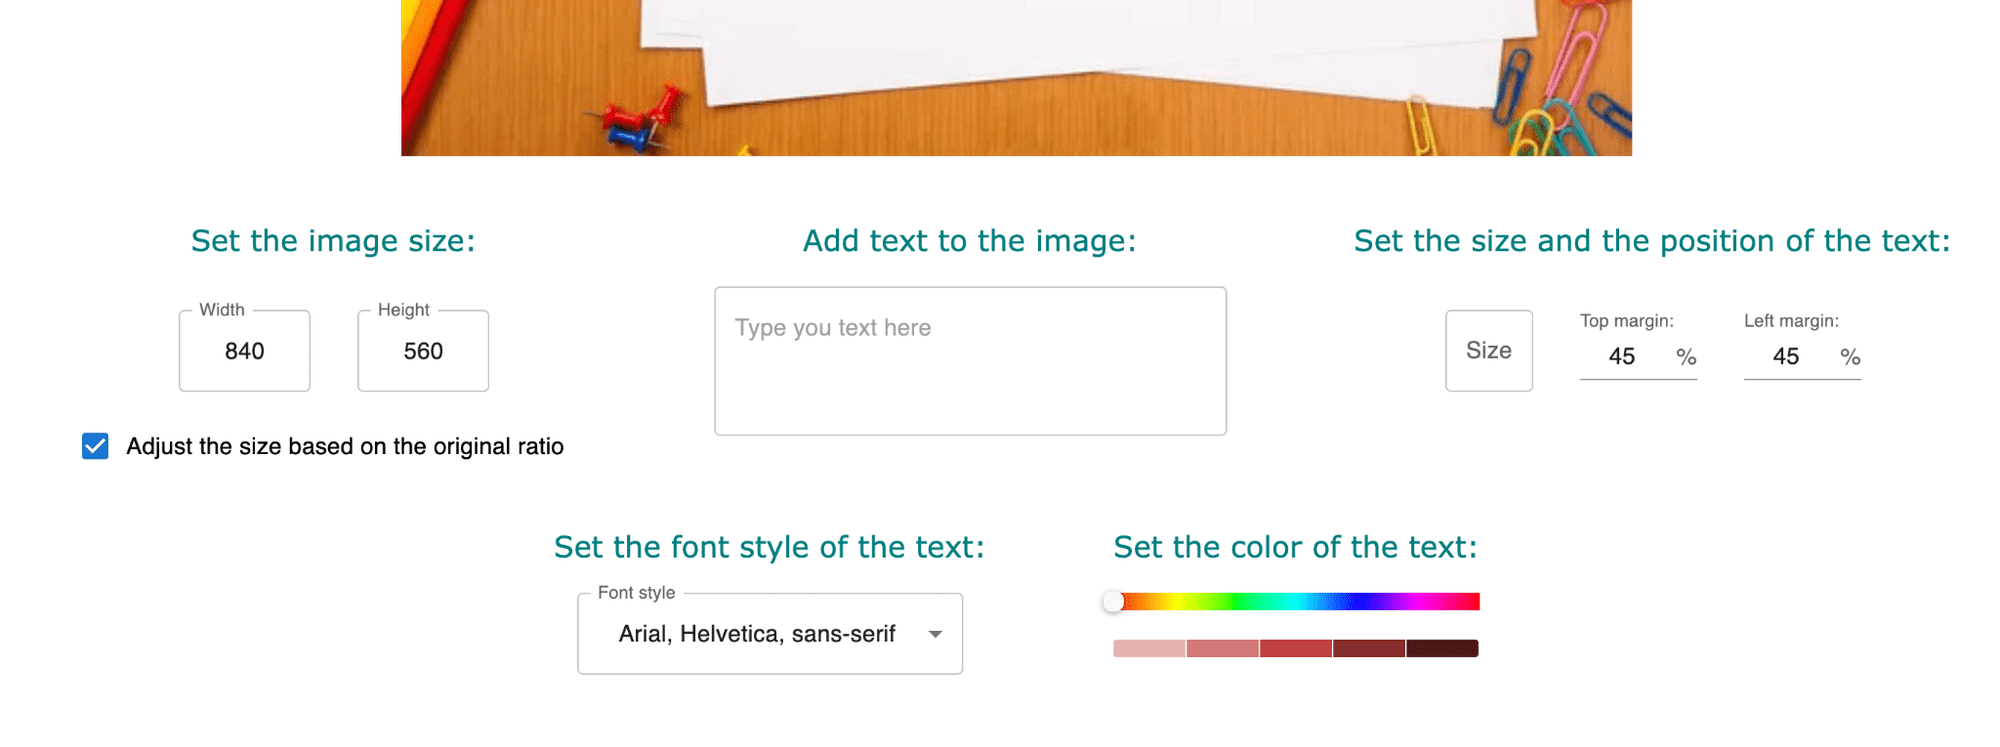
The parameter editing area is divided into 5 sections, corresponding to the 5 types of parameters of the image.
Parameter region 1: In the upper left area, users can adjust the size of the image, i.e. the width and height of the image. Their initial values will be the original size of the template. Under the 2 input boxes, there is another option available for the user to check - whether to keep the original aspect ratio of the image. If the user checks this option, then he only needs to change one of the width and height parameters, and the other one will be adjusted automatically according to the ratio.
Parameter region 2: Since users often need to add text to images to enrich the information they can express, we provide this parameter area to allow users to add text to images. Users can enter the text they want to add in this area. The input box supports line feed/space addition.
Parameter region 3: As the user adds text, the next 3 parameter areas will be around the formatting of the text for the users to adjust. First, the users can adjust the size of the text by entering a number into the text box. In this parameter region, the user can also adjust the position of the text: top margin represents the distance of the text to the top of the image, while left margin represents the distance of the text to the left of the image.
Parameter region 4: In the leftmost area of the second row, the user can select the font of the text. The initial value will be Arial, which is used by most people.
Parameter area 5: Finally the user can adjust the color of the text. The user needs to pick a general color on the color bar in the parameter region first, and then choose a specific one from the 5 colors shown below.
Since the above function involves basically the front-end, I used React to implement it. Each parameter region corresponds to a React component, which makes it convenient to manage. Each parameter corresponds to a React state, which makes it easy to adjust through the input box/dropdown menu. I imported MUI library to implement these input boxes. With these parameters, we just need to pass them into html and css styles to render them in the preview section.
The specific function to generate images for users to download is implemented by calling html2canvas library. html2canvas will take screenshots of the images in the preview section and return the screened images to ensure that the final images that users get are the same as those shown in the preview area.
Functional section
The functional section consists of 2 buttons, which provide downloading images and sharing images respectively.
When the user clicks the Download button, the html2canvas library mentioned above will take a screenshot of the image displayed in the preview section and download the screenshot to the user's local disk.
When the user clicks the Share button, a URL representing the image address will appear at the bottom, and the user can copy this link and put the image URL where he/she needs it, so that he/she can share the image with others without downloading it. Of course, this image is the same as the one shown in the preview section.
The image sharing feature involves the server part of the backend, which is mainly implemented using the Express.js framework. First, we need to pass all the parameters of the image in the preview section to the backend as a URL, and here I used the axios library. In the backend, I used a router to accept the URLs from the frontend and extract each parameter. After that, I used the canvas library to draw a consistent image with the front-end based on these parameters. This way, we successfully got the image generated by the user in the backend.
As we need to load the template selected by the user when drawing, we have to upload all the templates to the static resources on the backend server first. Since the whole project is created with the create-blocklet template, we can save these images to the datadir path of the blocklet. Likewise, after the backend successfully generates the images the user needs, we can write them to the datadir and mount them under the path assets. Finally, we just need to return the path/URL of this image to the front-end.
Git Repo and Blocklet Store
Feel free to try it out or fork and improve it to a real product.
Github:https://github.com/dnfisreal/image-generator
Blocklet Store: https://test.store.blocklet.dev/blocklets/z8ia3a66nQ7eqpSbj37cZj6qNnsmMsuUkATmP
Acknowledgement
This is the general introduction of this image generator. During this nearly three months internship, I am glad to finish a blocklet. I also learned a lot of knowledge from it that I usually can't get in touch with in school.
Thanks again to ArcBlock for giving me this opportunity!


